Monday, July 27, 2009

Creatalicious DT call

over on Bizzy Bec's CreataliciousChallenges they are calling for two new members to the Design Team.
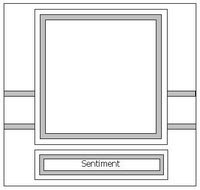
I quite liked the sketch they provided, so I thought I would give it a go.
I made up two cards using the sketch they provided - one oblong, and one square (which is a better representation of the sketch)
here is the first card I made
Tilda watercoloured and mounted on purple cardstock. colour for highlight panel picked from thin lines in background paper. Embellished with Paper flowers and bling.
Highlighted with usual kindy glitz ;-)
Here is the second card - this one is my favourite
Tilda image watercoloured and highlighted with kindyglitz & chalks, matted on blue Bazill bling. Pink Bazill bling run through cuttlebug. Paper flowers highlighted with bling - all mounted on white square card
This is the first time I have submitted a card for a DT call and would be extremely honoured to be considered.

Wednesday, July 22, 2009

Magnolia Down Under #18 - Christmas in July

Over on MagnoliaDownUnder the current challenge is Christmas in July.
My first thought was 'great', I don't have any Christmas Magnolia images!
I eventually found an image that could be used, so with a burst of relief, here is my Magnolia Christmas in July card.
off white square cardstock used as a base, Christmas DP as background. Tilda watercoloured and highlighted with chalks & kindy glitz. Embellished with organza ribbon with sparkles and paper flowers with bling. Gold Stickers Merry Christmas mounted with 3D foam tape.
Red panel embossed with Cuttlebug using Snowflakes embossing folder, spellbinder dies used to cut out oval panels.

Layout came from JustMagnoliaSketch#13

I am really pleased with the way this card turned out - I think it is a 'fun' Christmas Card - Now I have to decide who is special enough to get it ;-)

House Mouse #47 White on White

Over on HouseMouse the current challenge is white on white.

I quote from the blog - "White on White! I know this sounds somewhat misleading; but trust me, it is super-super easy! Actually, it is a total flip from last week's challenge. Last week, you were asked to create a card/project in which you could not color your adorable images...this week, you are to color your images, but everything else MUST be white...white papers, white embellies, white everything EXCEPT for your House Mouse, Happy Hoppers or Gruffies image. Sounds easy, right? Now, it is time for you to create your House Mouseterpiece And don't forget, HAVE FUN!!!"
This idea really appealed to me, so I went off to have a play. Let me say, it was a bit more difficult than I first thought!
So I settled on using three different textures of white cardstock - textured, wove and smooth. House Mouse make a wish was stamped on the smooth cardstock and coloured in with watercolours and ofcourse the obligatory kindy glitz ;-). Cuttlebug was used to cut out deckled rectangles. Rectangles were then heat embossed with silver (hope that doesn't count as a colour :-( ) and mounted in two layers using 3D foam tape. White organza ribbon with sparkles was laid across the middle and affixed using vellum tape. Happy Birthday sentiment is a rub-on.
I really like the clean simple lines of this card. Thanks House Mouse Challenge Blog - another great challenge that got the creative juices going!

Monday, July 20, 2009

Just Magnolia #14 - Buttons

Over on JustMagnolia the current challenge is to use buttons.
I have some lovely new magnolia images to colour in and just love Tilda carrying a basket & bottle of wine - those that know me, know I enjoy a glass of wine or two!
White square cardstock was stamped with swirls in two corners, DP layered across middle with ribbon embellishment. Tilda watercoloured and highlighted with kindy glitz, layered on ovals cut with Cuttlebug using spellbinder dies. Bling added to swirls and buttons added to the opposite corners.
Layout was inspired by an old Just Magnolia Sketch (#3). I am enjoying my water colouring, but I really need to update my glasses and get some nice fine brushes!

Saturday, July 18, 2009

Cuttlebug Be Inspired 40

Over on CuttlebugBeInspired#40 there is another great sketch!

White cardstock embossed with diamonds pattern. Whenever I look at this pattern, I always think of golf - so it just had to be a golf card! Sketch was rotated and put on a C6 size card.

Gold stickers of golf bag & clubs placed on acetate and raised with 3D mounting tape. Acetate attached using brown brads. Golf ball stickers used as embellishments.

I am not too sure on my choice of ribbon - I think I like it??

I do like the nice clean look!
Tuesday, July 14, 2009

Stamptacular Sunday Sketch #15

Over on StamptacularSundayChallenge another sketch appealed to me.
White square cardbase was used, black & white ribbon placed across middle. House Mouse image watercoloured and rub-on sentiment layered on Bazzil bling. left over bits of stickers used to highlight corners.
Cupcake highlighted with kindy glitz.

Magnolia Down Under #17

The MagnoliaDownUnder challenge have a great sketch
White cardstock, layered with DP, Bazzil bling used for panels. Magnolia image watercoloured and highlighted with kindy glitz. 3 paper flowers attached with brads. Fancy scalloped edge cut with my Robo. Green section embossed with cuttlebug.

I think I really need to update my glasses - my cutting is a bit off! ;-)

The three flowers also fit the CuteDaisyMay challenge of three of a kind!

Just Magnolia #13

Over on JustMagnolia a lovely sketch has been presented.
Items used: white square card base, bazzil bling, layered DP, ribbon. Cuttlebug was used to emboss the side panel. magnolia image was water coloured and highlighted with Kindy Glitz. Paper flowers x 3.
I like this layout and will use it again.
The three flowers also fit the CuteDaisyMay challenge of three of a kind!

Sunday, July 12, 2009

A new Craft ROBO card

here is another craft robo card - using another GSD file from http://risalenee.blogspot.com/ - these files are amazing.
This time I used the cat GSD - I have another friend who is a cat lover and would love this.

I used the same cardstock as I did previously for the dog, but have fine tuned my settings. I have not forgotten my cuttlebug through all this - I have used the birthday embossing folder for the background of the card and the first oval layer using my spellbinder nesties. The black oval was cut using the robo, as I needed an oval bigger than my largest nestie.
I have added some bling to the collar, just to add some fun.

Inside of card was printed using computer.

Forever Friends Sketch Challenge

I am a bit late, but here is a card inspired by forever_friends_sketch challenge.
I needed a card for a dear friend in USA - I didn't want to make it too girly ;-) We have been corresponding via snail mail since 1993. He is a lovely man - we worked for the same Insurance company - me in Adelaide and him in New York. When he was on holidays in Australia in 1993, he walked into the Adelaide office and introduced himself. Since I was on reception at the time, I was the lucky person who went for a cup of coffee with him later. We met again a few years later when he was back in Adelaide and have been corresponding ever since.
I don't write him as often as I should - correspondence is limited to a yearly letter and birthday card now. He has continued to write letters to me at least 3 or 4 times a year, sadly it is me letting the side down ;-(
White square cardstock, layered with DP and highlighted with black cardstock. Forever Friends image coloured in with watercolours.

When I finished the card, I though the image looked lost, so I added black corner stickers - I think it brings the attention back to the bear! What do you think?

Tuesday, July 7, 2009

More of my new toy!

Well I have been having a ball playing with my 'Robo Cop' (as my husband calls it LOL)
I tried an experiment with some lattice work cutting - I think I have to work on a higher pressure to cut through the card, as not all the fine bits were done. I am sure it won't take me long to learn which settings to select for my cardstock. Here is my toy in action!
Here is the end result of my first lattice card! I placed a white envelope behind the cutwork for the photo - I think I will place pearl paper as an insert, when I decide what words I am going to put on the inside. I am intending to heat emboss some wedding rings in silver on the centre panel. Will post another picture when finished.
I also downloaded some absolutely wonderful GSD files from http://risalenee.blogspot.com/ - you really must go have a look. You will be amazed with the things this lady has done - and she shares them with others freely!
I just fell in love with this image the moment I saw it, and just had to try. I have a friend who is a dog lover and will absolutely love this!
I really need to learn to get my settings right - I think I need to increase my pressure a bit more - I am so scared of cutting right through the carrier sheet LOL I am afraid my cutting did not do the GSD file justice.

Saturday, July 4, 2009

Craft ROBO - my new toy!

I have a new toy - a Craft ROBO. I have wanted one for ages, so have finally decided to get one. Now I can cut all sorts of things out - I am not limited to using cartridges or dies - the possibilities are endless!
My first experiment was to cut out my name - I wonder just how many people did that as their first try LOL
Then I cut some really fine text
then as I got a bit more comfortable, I used the 'GOOD' pearl paper to cut out some Christmas type words and images.
then came the really big experiment - to print an image I already had and cut it out - worked first time! how cool is that!
At this point I should really thank the members over at CraftMad_Forum - they were most helpful in helping me decide which cutting machine to purchase. Lana - affectionately known as the ROBO Queen - is most eager to help anyone who asks - I am sure we will be corresponding a lot in the near future.
then I went on a search of the net to see what I could find for free - and came across this site http://mamawslegacy.com/ - there is a wealth of information over there - Mary's_Blog is wonderful too! I am sure I am going to enjoy this new direction in my crafting.
The following is the shirt & tie GSD file from Mary - I cut the shirt from white cardstock, and the tie 'bits' from DP. I think next time, I will mount the DP with jac paper to some light cardstock before cutting. I will do something with this card to finish it off later.
so here is my first REAL creation - a Christmas Card.
I used one of the GSD files that came with the SkatKutz disc that came with the Robo, Bazzill bling run through the cuttlebug as a background, highlighted with gold corner stickers. Mounted greeting using 3D foam and highlighted with kindy glitz.

I love the clean cutting lines - I am so happy with my new toy!